Projects > Building a Harp Guitar
If you build it it will twang!
Harp guitar project
What do you do when you want a harp guitar but don’t yet know what you want? How might you find out whether or not you want 5, 6 or maybe 7 harp strings? What about string spacing, or what angle you want them relative to the regular neck? Well...why not make one and find out?
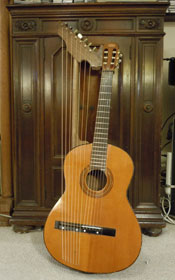
This guitar was a real “Rube Goldberg” from the start. I’ve had this particular “breadboard” instrument kicking around the house for a while. It had undergone a number of experiments, so why not more surgery? I thought about using a better guitar, but I figured if it blew up, it wouldn’t matter. If I proved the concept (cheap, sturdy, playable) I could always do this again on a better instrument, and incorporate better materials and building methods.
The craftsmanship is unabashedly down and dirty. The principle was this: create a self-contained harp support structure that was independent of the guitar support structure and stick it inside. Bolt it and glue it in place, and simply let the strings lie across an extended bridge. The bridge extension and anchor pins, a hole in the side, an anchor bolt, and an extra end block are the modifications. The post and headstock can easily be removed as they are held with screws. You can remove the harp assembly in under fifteen minutes using only a screw driver. One could make an attachable/removable bridge I suppose. The pins, made from coat-hanger wire pull right out. They are anchored in the new end block which is glued to the side and the kerfing but not the top (there is 3/32” clearance).
I did this with the basic tools: drill, drill press, belt sander, cheesy band saw, hack saw, some files, screw drivers, clamps, pocket knife, and whatever was lying around including plywood, dowels, a scrap of aluminum tubing from a broken hang glider control bar, a piece of copper fuel line, a couple of bolts and screws, an angle bracket or two, coat hanger wire, super glue, steel filler epoxy and some scrap tuners from a junk box.
The guitar, as mentioned, was a project instrument that had been an experimental platform for: X-bracing on a classical body for steel strings; practice installation of LEDs in the fingerboard; sound port shapes & location; and experimenting with neck profiles (so the neck, somewhat reduced from a standard classical neck, is now 1-15/16”). This guitar has a real junker of a plywood top. But even with all the drawbacks of crummy wood it has the vibe that you get from a classical shape sound box with steel strings — which I love.
The harp framework adds weight to the guitar and soaks up energy, which isn’t good, but it does create sustain. On the flip side, there’s all those wonderful harmonics that are bouncing around in the harp strings, so some of what gets lost is given back. If I were to do it over I would use hardwood-quality plywood instead of scrap construction-grade plywood in the added heel block (see photos) and maybe carbon fiber tubing. Also, I thoughtlessly used junk plywood when I was beefing up the neck block, back when I added the truss rod and new fingerboard with the LEDs. What was I thinking? ... Next time of course everything will be a lot cleaner.
Here’s an instrument that works, and all the parts cost about as much as a set of harp guitar strings.
Here’s a tour of the process in pictures, starting with the blue print, parts layout and order of assembly, more or less. Do try this at home... Have fun. Twang! KN
Home ::
Calendar ::
Listen & Watch ::
Recordings ::
Photo Galleries ::
Press ::
Bio ::
Workshops & Private Instruction ::
About Stanley Watson ::
Mad Scientist Guitar Projects ::
Contact & Booking ::
Photos & Posters for booking ::
Links
©Copyright 2007-2024, Kinoch Nelson, All Rights Reserved
Design by GCN, development by Red Beagle Web Development


![[X]](./popupimage/images/close.gif)
